Contents
Introduction
Digital audio files fall into two main categories: lossless formats and lossy compressed formats. Each category has specific implications for audio quality and for the applicability of techniques such as steganography.
Lossless formats may either compress information or not, but if they do, they perform lossless compression. Lossless compression formats reduce file size without removing information from the audio signal, enabling exact reproduction of the original. Notable examples include FLAC (Free Lossless Audio Codec), WAV (Waveform Audio File Format), and ALAC (Apple Lossless Audio Codec). These formats are ideal for professional applications such as audio editing, music production, and archiving high-fidelity recordings, where signal integrity is paramount.
By contrast, lossy formats use algorithms that remove components of the audio signal considered less perceptible to the human ear, achieving a significant reduction in file size. However, this compression is irreversible and can affect sound quality, especially at low bitrates. The most common formats in this category are MP3 (MPEG-1 Audio Layer 3), AAC (Advanced Audio Codec), and OGG Vorbis. These formats are widely used for online music distribution, streaming services, and portable devices due to their compression efficiency.
Audio steganography consists of hiding information within sound files so that it is imperceptible to the listener. The choice of audio format is crucial for the effectiveness of steganographic techniques. Lossless formats are better suited to steganography because they preserve the integrity of the audio signal. Since no information is discarded during compression, the modifications made to hide data remain intact, enabling reliable recovery of the hidden information. For example, in WAV files it is common to use techniques based on the Least Significant Bit (LSB), such as LSB replacement or LSB matching as studied in Embedding Techniques, which allow modifying audio samples to insert data without perceptible degradation in sound quality.
In contrast, steganography in lossy formats such as MP3 is more complex because the compression process removes information from the audio signal, which can destroy or alter the hidden data. Although there exist advanced techniques designed to adapt to the characteristics of these formats, they are difficult to use in Python because low-level libraries to access and modify the necessary data are lacking.
When selecting an audio format for steganographic applications, it is essential to consider the balance between sound quality, file size, and the robustness of the hiding technique. Lossless formats offer a safer environment for steganography, whereas lossy formats present greater challenges for preserving the integrity of hidden information.
In the following sections, we will explore several techniques for inserting information into these formats and analyze their advantages and limitations.
Sound Digitization
Sound is a mechanical vibration that propagates through an elastic medium such as air, water, or solids. It is generated when an object vibrates and transmits this vibration to surrounding molecules, creating a pressure wave that travels through the medium. Unlike electromagnetic waves, sound requires a material medium for transmission and thus cannot travel in a vacuum. Its propagation speed varies by medium: in air at room temperature (~20°C) it is approximately 343 m/s, in water it can reach about 1500 m/s, and in solids such as steel it can exceed 5000 m/s.
From a physical perspective, sound consists of longitudinal waves in which the molecules of the medium oscillate in the same direction as the wave propagates. These waves exhibit alternating regions of compression and rarefaction, leading to pressure fluctuations detectable by the human auditory system. The frequency of these oscillations determines the pitch of the sound—low frequencies produce bass tones, and high frequencies produce treble tones. The human ear can perceive frequencies roughly between 20 Hz and 20 kHz, although this range tends to decline with age.
Another fundamental attribute of sound is its amplitude, which relates to perceived loudness. It is measured in decibels (dB) and represents the magnitude of the pressure variations in the wave. A whisper is around 30 dB, whereas the noise of a jet engine can exceed 120 dB—a level that can cause hearing damage. Besides frequency and amplitude, the phase of a sound wave defines its relative position in time and is key in sound synthesis and audio signal processing.
Human perception of sound relies on the auditory system, composed of the outer ear, middle ear, and inner ear. The outer ear captures sound waves and directs them to the eardrum, which vibrates in response. These vibrations are amplified by the ossicles of the middle ear (malleus, incus, stapes) and then transmitted to the inner ear. There, in the cochlea, the vibrations are converted into electrical impulses by specialized hair cells. These impulses travel via the auditory nerve to the brain, where they are interpreted as sounds.
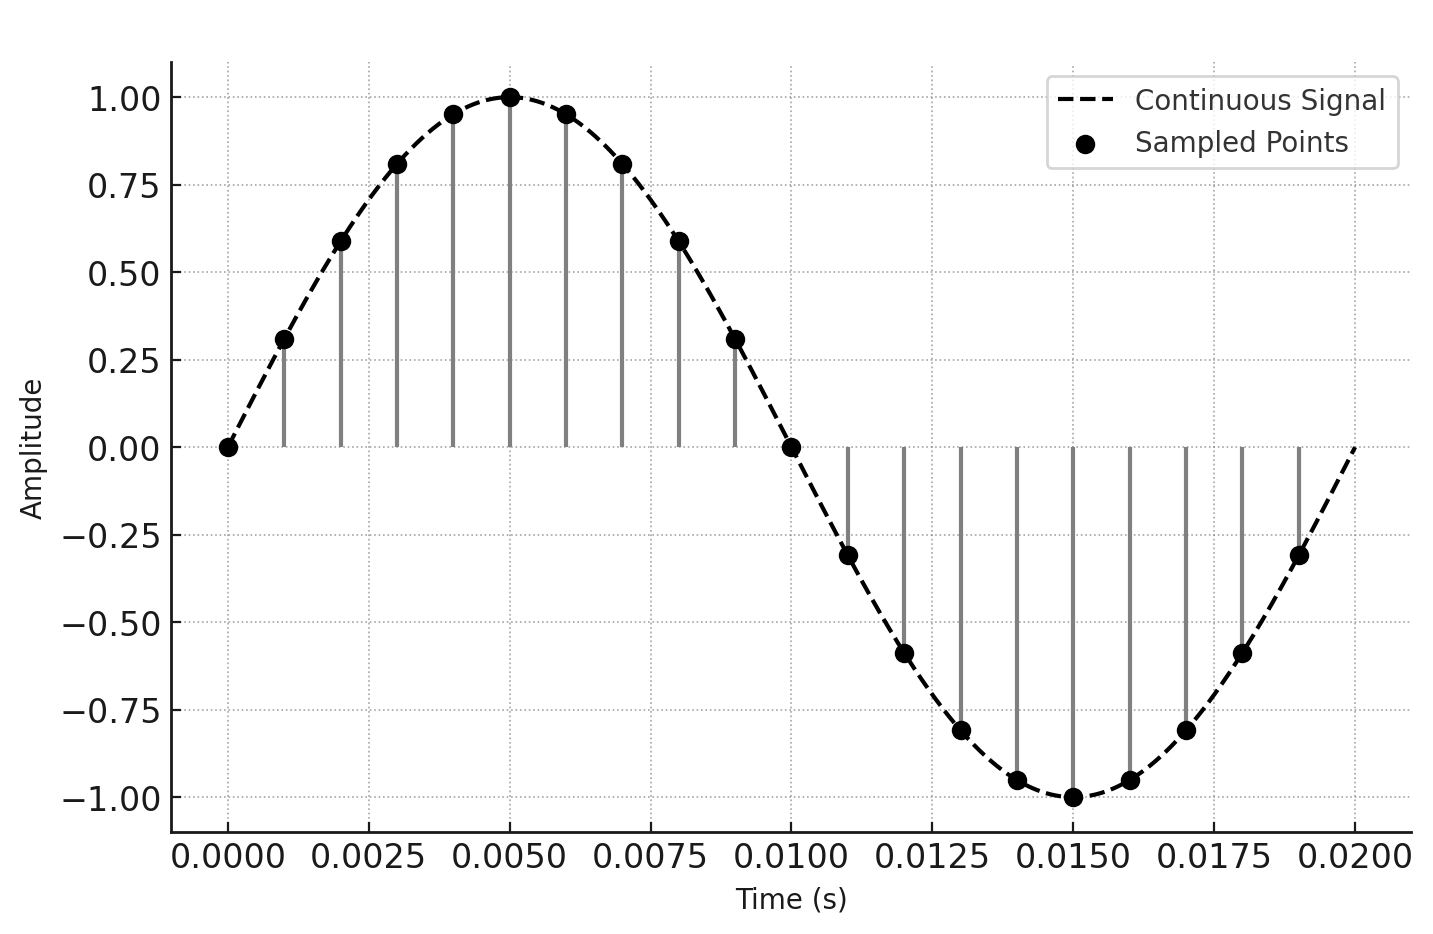
Sound digitization is the process by which a continuous acoustic signal is converted into a sequence of discrete numerical values. This is essential for storing, transmitting, and manipulating sound in digital systems. Unlike an analog signal—which varies continuously in time and amplitude—a digital signal is a quantized approximation in which sound is represented as a series of numerical samples taken at regular intervals.
To digitize sound, Pulse Code Modulation (PCM) is employed: discrete values of the signal are captured at a given sampling frequency and with a specific bit depth. The sampling frequency determines how many times per second the signal is sampled and is expressed in Hertz (Hz). According to the Nyquist–Shannon sampling theorem, to reconstruct an analog signal faithfully without information loss, the sampling frequency must be at least twice the highest frequency present in the original signal. In audio applications, a frequency of 44.1 kHz is common in formats such as WAV and CD-Audio, while high-fidelity recordings use 48 kHz, 96 kHz, or even 192 kHz.
In addition to sampling frequency, another crucial factor in digitization is bit depth, which determines the number of quantization levels available to represent the signal’s amplitude. In a 16-bit system, each sample can take one of $2^{16}$ distinct values, whereas in a 24-bit system—used in professional recording studios—the number of levels exceeds $2^{24}$. Greater bit depth allows a wider dynamic range and lower distortion in the representation of sound.
The WAV (Waveform Audio File Format) format is one of the most commonly used for storing digital sound in its purest form. Developed by Microsoft and IBM, WAV is based on PCM, which means that audio samples are stored directly, without compression, preserving the fidelity of the original sound. Due to its structure, WAV files can be large compared to compressed formats, but they offer advantages in environments where sound quality is a priority, such as music production, audio editing, and signal processing.
In a WAV file, audio information is organized into data blocks containing samples along with metadata describing the file structure, such as sampling frequency, bit depth, and the number of channels (mono or stereo). Since WAV is a flexible container, it can also store compressed audio using codecs such as ADPCM, although its primary use remains uncompressed PCM audio.
Because WAV can represent sound with high precision, it is widely adopted in applications where fidelity is essential. However, in contexts where storage or transmission requires reduced size, formats such as MP3 or AAC are more suitable. The choice of audio format therefore depends on the balance among quality, size, and intended use.
The format relies on the RIFF (Resource Interchange File Format) structure, which organizes content into data blocks or chunks. Its most common use is PCM audio storage, which represents digitized sound samples directly without compression or quality loss.
A WAV file consists of three main sections: the RIFF header, the fmt chunk, and the data chunk. Each section contains essential information about the file and how to interpret its samples.
The RIFF header is the first block of the file and has a fixed size of 44 bytes when using PCM audio without additional metadata. It contains:
- RIFF identifier (4 bytes): The string “RIFF”, indicating the file follows the RIFF structure.
- File size (4 bytes): The total file size in bytes, excluding the first 8 bytes of the header.
- Format identifier (4 bytes): The string “WAVE”, indicating the file is a WAV file.
Next is the fmt chunk, which stores information about the audio format. This chunk is at least 16 bytes in its standard version and contains:
- Chunk ID (4 bytes): The string “fmt ” (with a trailing space).
- Chunk size (4 bytes): The size of the chunk—typically 16 bytes for PCM.
- Audio format (2 bytes): The type of audio encoding. The value 1 represents uncompressed PCM.
- Number of channels (2 bytes): Mono (1) or stereo (2).
- Sampling frequency (4 bytes): The sampling rate in Hz, e.g., 44,100 Hz for CD audio.
- Byte rate (4 bytes): The number of bytes processed per second, computed as
where
- $B$ is the byte rate (bytes per second),
- $f_s$ is the sampling frequency in Hz,
- $C$ is the number of audio channels (1 for mono, 2 for stereo, etc.),
-
$D$ is the bit depth (bits per sample).
- Block align (2 bytes): The number of bytes per sample frame across channels.
- Bit depth (2 bytes): The resolution of each audio sample, usually 16 or 24 bits.
After the header and fmt chunk, the file contains the data chunk, where audio samples are stored. This chunk has the structure:
- Chunk ID (4 bytes): The string “data”.
- Data size (4 bytes): The total number of bytes in this section.
- Audio samples: Each sample is stored in PCM format, with size depending on bit depth. For 16-bit audio, each sample occupies 2 bytes; for 24-bit, 3 bytes. In stereo files, left and right channel samples are interleaved.
PCM samples are stored in little-endian byte order, meaning the least significant byte is stored first. This is common in systems following Intel processor architectures.
Despite its age, the WAV format remains a standard in the audio industry due to its simplicity and reliability. Its compatibility across systems and capacity to store lossless audio make it ideal for digital signal processing and for implementing advanced techniques such as audio steganography.
The following example shows how to read a WAV audio file and extract its basic information, including number of channels, sample size, and total number of samples. Depending on the file’s bit depth, the code selects the appropriate data type to interpret audio samples correctly.
Since NumPy does not natively support a 24‑bit data type, when the file uses 3‑byte samples it is necessary to reconstruct values manually into signed 32‑bit integers (int32). For this purpose, the convert_ui24_to_i32 function takes raw 24‑bit data and correctly transforms it to a 32‑bit format, adjusting the sign bit when necessary.
The code also handles 8‑, 16‑, and 32‑bit files correctly, using the appropriate NumPy types. The complete example follows:
import wave
import numpy as np

def convert_ui24_to_i32(audio_data):
    audio_data = audio_data.reshape(-1, 3)
    int32_data = (audio_data[:, 0].astype(np.int32) |
                  (audio_data[:, 1].astype(np.int32) << 8) |
                  (audio_data[:, 2].astype(np.int32) << 16))
    int32_data[int32_data > 0x7FFFFF] -= 0x1000000
    return int32_data


wav_filename = "audio.wav"

wav_file = wave.open(wav_filename)
num_channels = wav_file.getnchannels() #1=mono, 2=stereo
sample_width = wav_file.getsampwidth()
num_frames = wav_file.getnframes()

print(f"channels: {num_channels}")
print(f"sample width: {sample_width}")
print(f"num frames: {num_frames}")

raw_data = wav_file.readframes(num_frames)


if sample_width == 1:
    audio_data = np.frombuffer(raw_data, dtype=np.uint8)
    audio_data = audio_data.astype(np.int16) - 128

elif sample_width == 2:
    audio_data = np.frombuffer(raw_data, dtype='<i2')

elif sample_width == 3:
    audio_data = np.frombuffer(raw_data, dtype=np.uint8)
    audio_data = convert_ui24_to_i32(audio_data)

elif sample_width == 4:
    audio_data = np.frombuffer(raw_data, dtype='<i4')

else:
    raise ValueError("Wrong format")

print(audio_data.shape, audio_data.dtype)
The output for an example file is:
channels: 2
sample width: 3
num frames: 1605888
(3211776,) uint16
In the code above, we see the number of frames. A frame (sample frame) is a set of samples corresponding to the same instant in time across all audio channels. The relation between frames and samples depends on the number of channels:
- In mono audio (1 channel), a frame and a sample are equivalent.
- In stereo audio (2 channels), a frame contains two samples (one per channel).
- In multichannel audio, a frame contains one sample per audio channel.
For example, in a stereo WAV file with 16‑bit depth per channel, each sample occupies 2 bytes and each frame occupies 4 bytes (2 channels × 2 bytes per sample). Thus, when processing digital audio files, it is important to distinguish between frames and samples—especially with multichannel audio.
Now that we can read the audio file, it is often useful to visualize it. We can add the following Python code:
import matplotlib.pyplot as plt

if num_channels == 2:
    audio_data = audio_data.reshape(-1, 2)
    audio_data_left = audio_data[:, 0]
    audio_data_right = audio_data[:, 1]
else:
    audio_data_left = audio_data
    audio_data_right = None

start_sample = 0
end_sample = min(10000, len(audio_data_left))
frame_rate = wav_file.getframerate() if 'frame_rate' in globals() else 44100
time_axis = np.linspace(0, end_sample / frame_rate, end_sample)

fig, axes = plt.subplots(2, 1, figsize=(10, 6), sharey=True)

axes[0].plot(time_axis,
    audio_data_left[start_sample:end_sample])
axes[0].set_ylabel("Amplitude")
axes[0].set_title("Waveform - Left Channel")
axes[0].grid()

if num_channels == 2:
    axes[1].plot(time_axis,
        audio_data_right[start_sample:end_sample])
    axes[1].set_ylabel("Amplitude")
    axes[1].set_title("Waveform - Right Channel")
    axes[1].grid()
else:
    fig.delaxes(axes[1])

plt.xlabel("Time")
plt.tight_layout()
plt.show()
This produces a plot similar to Figure 2.

Embedding Data in Audio
Introduction
Lossless audio steganography is based on directly modifying audio sample values in formats that do not apply lossy compression that would degrade the original signal. This approach enables hiding information without the risk of message loss due to lossy compression.
The WAV format—because it stores uncompressed PCM—is particularly suitable for lossless audio steganography. Each audio sample is stored with a specific bit depth (e.g., 16 or 24 bits), allowing precise modifications without introducing audible artifacts.
In the previous example we saw how to read information from a WAV file. To use steganography we must also modify the samples and write the file back. We start with a full example of this process:
import wave
import numpy as np

def convert_ui24_to_i32(audio_data):
    audio_data = audio_data.reshape(-1, 3)
    int32_data = (audio_data[:, 0].astype(np.int32) |
                  (audio_data[:, 1].astype(np.int32) << 8) |
                  (audio_data[:, 2].astype(np.int32) << 16))
    int32_data[int32_data > 0x7FFFFF] -= 0x1000000
    return int32_data

def convert_i32_to_ui24(audio_data):
    audio_data = np.clip(audio_data, -8388608, 8388607)
    uint24_data = np.zeros((len(audio_data), 3),
                            dtype=np.uint8)
    uint24_data[:, 0] = audio_data & 0xFF
    uint24_data[:, 1] = (audio_data >> 8) & 0xFF
    uint24_data[:, 2] = (audio_data >> 16) & 0xFF
    return uint24_data.flatten()

wav_filename = "audio.wav"
wav_file = wave.open(wav_filename, 'rb')

num_channels = wav_file.getnchannels()
sample_width = wav_file.getsampwidth()
frame_rate = wav_file.getframerate()
num_frames = wav_file.getnframes()

print(f"channels: {num_channels}")
print(f"sample width: {sample_width} bytes")
print(f"num frames: {num_frames}")

raw_data = wav_file.readframes(num_frames)
wav_file.close()

if sample_width == 1:
    audio_data = np.frombuffer(raw_data, dtype=np.uint8)
    audio_data = audio_data.astype(np.int16) - 128

elif sample_width == 2:
    audio_data = np.frombuffer(raw_data, dtype='<i2')

elif sample_width == 3:
    audio_data = np.frombuffer(raw_data, dtype=np.uint8)
    audio_data = convert_ui24_to_i32(audio_data)

elif sample_width == 4:
    audio_data = np.frombuffer(raw_data, dtype='<i4')

else:
    raise ValueError("Wrong format")

audio_data = audio_data.copy()
audio_data[0] += 1

if sample_width == 1:
    raw_data_modified =         (audio_data + 128).astype(np.uint8).tobytes()

elif sample_width == 2:
    raw_data_modified = audio_data.astype('<i2').tobytes()

elif sample_width == 3:
    raw_data_modified = convert_i32_to_ui24(audio_data).tobytes()

elif sample_width == 4:
    raw_data_modified = audio_data.astype('<i4').tobytes()

else:
    raise ValueError("Wrong format")

output_filename = "audio_stego.wav"
with wave.open(output_filename, 'wb') as output_wav:
    output_wav.setnchannels(num_channels)
    output_wav.setsampwidth(sample_width)
    output_wav.setframerate(frame_rate)
    output_wav.writeframes(raw_data_modified)
Note that in a WAV file, audio data are stored in an interleaved format when there is more than one channel. This means that samples from each channel alternate in the data stream rather than being stored separately. The most common structure is stereo (two channels), where left and right samples are interleaved at each sampling instant.
For a stereo file, the layout of samples in the data sequence follows:
[sample_0_left, sample_0_right, sample_1_left, sample_1_right, sample_2_left, sample_2_right, ...]
Each pair of samples represents the same instant in time, with one sample for each channel.
When a stereo WAV file is loaded into a NumPy array, the original data structure is a flat vector of consecutive samples. To facilitate per‑channel processing, it can be reshaped into a matrix of shape $(N, 2)$, where $N$ is the number of samples and each row contains the left and right channel values:
\[\text{audio\_data} = \begin{bmatrix} L_0 & R_0 \\ L_1 & R_1 \\ L_2 & R_2 \\ \vdots & \vdots \end{bmatrix}\]This format enables modifications to one channel without affecting the other—for example, reducing the amplitude of the left channel while leaving the right channel unchanged.
Before writing back to a WAV file, the data must be flattened to the original interleaved format. This is achieved by the inverse reshape in NumPy, ensuring that the per‑channel samples are interleaved correctly.
This can be done as follows. To reshape data for stereo audio:
if num_channels == 2:
    audio_data = audio_data.reshape(-1, 2)
To return to the flat format before saving:
if num_channels == 2:
    audio_data = audio_data.reshape(-1)
However, these operations are not strictly necessary for steganography; it depends on the method used for embedding and how it is applied.
LSB matching
In Embedding Techniques: Bit Embedding in the LSB, we explained the LSB matching method as a technique to modify the least significant bits of a set of values to hide information. Here, we apply this method to embed data in a digital WAV audio file.
In a digital audio file, the sound signal is represented by a sequence of discrete samples, where each sample is an integer value indicating the signal’s amplitude at a given instant. Samples may use different bit depths, most commonly 8, 16, 24, or 32 bits per sample. LSB matching modifies the least significant bit of these samples to encode the desired information. If a sample’s LSB does not match the bit to be embedded, the sample is randomly incremented or decremented by one.
The following Python code implements LSB matching to hide a message in a digital audio file.
First, the message is converted to a sequence of bits using its binary representation. Then we iterate over audio samples and randomly modify the LSB of a sample to store each bit of the message.
Note that the lsb_matching_audio function never performs a +1 operation on samples already at the maximum allowed value for the bit depth, nor a -1 on samples at the minimum. This is because the range of each sample is constrained by its data type. For 16‑bit audio, for example, samples are integers in the range $-32768$ to $32767$. Adding 1 to a sample at the maximum value would cause an overflow, resulting in a drastic change in the signal that could be detectable statistically or even audible.
For these reasons, any LSB modifications must be performed with care to minimize audio quality impact and avoid audible artifacts.
Below is a Python example embedding data via LSB matching. It reuses the previously defined convert_ui24_to_i32 and convert_i32_to_ui24 helpers (not repeated here). The message is decomposed into bits, and one bit is embedded per audio sample. Note the use of per‑type minima and maxima in lsb_matching to avoid overflows.
import random
import wave
import numpy as np

def lsb_matching(value, bit, mx=255, mn=0):
    if value % 2 == bit:
        return value
    if value == mx:
        s = -1
    elif value == mn:
        s = +1
    else:
        s = random.choice([-1, 1])
    return value + s

# < convert_ui24_to_i32 and convert_i32_to_ui24 code


def embed(wav_filename_in, wav_filename_out, message):

    wav_file = wave.open(wav_filename_in, 'rb')

    num_channels = wav_file.getnchannels()
    sample_width = wav_file.getsampwidth()
    frame_rate = wav_file.getframerate()
    num_frames = wav_file.getnframes()

    raw_data = wav_file.readframes(num_frames)
    wav_file.close()

    if sample_width == 1:
        mx, mn = 127, -128
        audio_data = np.frombuffer(raw_data, dtype=np.uint8)
        audio_data = audio_data.astype(np.int16) - 128

    elif sample_width == 2:
        mx, mn = 32767, -32768
        audio_data = np.frombuffer(raw_data, dtype='<i2')

    elif sample_width == 3:
        mx, mn = 8388607, -8388608
        audio_data = np.frombuffer(raw_data, dtype=np.uint8)
        audio_data = convert_ui24_to_i32(audio_data)

    elif sample_width == 4:
        mx, mn = 2147483647, -2147483648
        audio_data = np.frombuffer(raw_data, dtype='<i4')

    else:
        raise ValueError("Wrong format")

    audio_data = audio_data.copy()

    message_bits = ''.join(format(ord(c), '08b')         for c in message)

    if len(message_bits) > len(audio_data):
        raise ValueError("Message too long")

    for i in range(0, len(message_bits)):
        bit = int(message_bits[i])
        audio_data[i] =             lsb_matching(audio_data[i], bit, mx, mn)

    if sample_width == 1:
        raw_data_modified =             (audio_data + 128).astype(np.uint8).tobytes()

    elif sample_width == 2:
        raw_data_modified =             audio_data.astype('<i2').tobytes()

    elif sample_width == 3:
        raw_data_modified =             convert_i32_to_ui24(audio_data).tobytes()

    elif sample_width == 4:
        raw_data_modified =             audio_data.astype('<i4').tobytes()

    else:
        raise ValueError("Wrong format")

    with wave.open(wav_filename_out, 'wb') as output_wav:
        output_wav.setnchannels(num_channels)
        output_wav.setsampwidth(sample_width)
        output_wav.setframerate(frame_rate)
        output_wav.writeframes(raw_data_modified)

message = "Hidden text"
embed("audio.wav", "audio_stego.wav", message)
Next we present code to extract the message. The process is the reverse: we iterate over audio samples, extract the LSB, and finally reconstruct the message.
To recover the embedded message, we must iterate over samples in the same order as used for embedding and read the LSB from the corresponding channel. The bits are then grouped in blocks of 8 to reconstruct characters in ASCII. The process ends when the entire message has been extracted. In this toy example, we have not implemented a mechanism to determine the message length; we simply extract 88 bits, which is what we need. There are various ways to handle length, such as inserting a header with the length, or embedding an explicit end‑of‑message marker. We will address these later.
import wave
import numpy as np

# < convert_ui24_to_i32  code

def extract(wav_filename_in, msglen):

    wav_file = wave.open(wav_filename_in, 'rb')

    num_channels = wav_file.getnchannels()
    sample_width = wav_file.getsampwidth()
    frame_rate = wav_file.getframerate()
    num_frames = wav_file.getnframes()

    raw_data = wav_file.readframes(num_frames)
    wav_file.close()

    if sample_width == 1:
        audio_data = np.frombuffer(raw_data, dtype=np.uint8)
        audio_data = audio_data.astype(np.int16) - 128

    elif sample_width == 2:
        audio_data = np.frombuffer(raw_data, dtype='<i2')

    elif sample_width == 3:
        audio_data = np.frombuffer(raw_data, dtype=np.uint8)
        audio_data = convert_ui24_to_i32(audio_data)

    elif sample_width == 4:
        audio_data = np.frombuffer(raw_data, dtype='<i4')

    else:
        raise ValueError("Wrong format")


    message_bits = []
    for i in range(0, msglen):
        bit = audio_data[i]%2
        message_bits.append(bit)

    message_bits = ''.join(map(str, message_bits))
    message = ''.join(chr(int(message_bits[i:i+8], 2))         for i in range(0, len(message_bits), 8))

    return message


message = extract("audio_stego.wav", 88)
print(message)
Matrix embedding
In the referenced section we introduced matrix embedding as a technique to embed more information with fewer modifications. Here we apply it to embed data in a WAV audio file.
Below is a Python example that uses matrix embedding for audio. The code uses the matrix embedding helpers from the cited section and the LSB matching function from the previous section.
We compute the binary representation of the message to be hidden and store it in message_bits. We use a code with $p=3$, so in each block of $2^p-1$ audio samples we can embed 3 message bits. To ensure the message length is a multiple of 3, we add trailing zeros (padding).
We then iterate over audio samples, processing blocks of size $2^p-1$. For each block we determine which samples must be modified to embed the corresponding 3 message bits, ensuring the number of changes is minimal. After making the modifications we save the modified audio as a new stego file.
As before, we reuse the convert_ui24_to_i32 and convert_i32_to_ui24 helpers from previous sections and omit them here.
import random
import wave
import numpy as np

P = 3
BLOCK_LEN = 2**P-1
M = np.array([
    [0, 0, 0, 1, 1, 1, 1],
    [0, 1, 1, 0, 0, 1, 1],
    [1, 0, 1, 0, 1, 0, 1]
])

def lsb_matching(value, bit, mx=255, mn=0):
    if value % 2 == bit:
        return value
    if value == mx:
        s = -1
    elif value == mn:
        s = +1
    else:
        s = random.choice([-1, 1])
    return value + s

def ME_embed(M, c, m):
    s = c.copy()
    col_to_find = (np.dot(M, c) - m) % 2
    for position, v in enumerate(M.T):
        if np.array_equal(v, col_to_find):
            s[position] = (s[position] + 1) % 2
            break
    return s

# < convert_ui24_to_i32 and convert_i32_to_ui24 code

def embed(wav_filename_in, wav_filename_out, message):

    wav_file = wave.open(wav_filename_in, 'rb')

    num_channels = wav_file.getnchannels()
    sample_width = wav_file.getsampwidth()
    frame_rate = wav_file.getframerate()
    num_frames = wav_file.getnframes()

    raw_data = wav_file.readframes(num_frames)
    wav_file.close()

    if sample_width == 1:
        mx, mn = 127, -128
        audio_data = np.frombuffer(raw_data, dtype=np.uint8)
        audio_data = audio_data.astype(np.int16) - 128

    elif sample_width == 2:
        mx, mn = 32767, -32768
        audio_data = np.frombuffer(raw_data, dtype='<i2')

    elif sample_width == 3:
        mx, mn = 8388607, -8388608
        audio_data = np.frombuffer(raw_data, dtype=np.uint8)
        audio_data = convert_ui24_to_i32(audio_data)

    elif sample_width == 4:
        mx, mn = 2147483647, -2147483648
        audio_data = np.frombuffer(raw_data, dtype='<i4')

    else:
        raise ValueError("Wrong format")

    audio_data = audio_data.copy()

    message_bits = [
        int(bit) for byte in message.encode()
        for bit in format(byte, '08b')
    ]
    padding = (-len(message_bits)) % P
    message_bits += [0] * padding
    message_bits = np.array(message_bits)

    if len(message_bits) > len(audio_data):
        raise ValueError("Message too long")

    num_blocks = len(message_bits)//3

    j = 0
    for i in range(0, num_blocks*BLOCK_LEN, BLOCK_LEN):
        c = audio_data[i:i+BLOCK_LEN]%2
        m = message_bits[j:j+P]
        s = ME_embed(M, c, m)
        dif_idx = np.flatnonzero(c != s)
        if dif_idx.size>0:
            audio_data[i+dif_idx] =                 lsb_matching(audio_data[i+dif_idx], s[dif_idx])
        j += P

    if sample_width == 1:
        raw_data_modified =             (audio_data + 128).astype(np.uint8).tobytes()

    elif sample_width == 2:
        raw_data_modified =             audio_data.astype('<i2').tobytes()

    elif sample_width == 3:
        raw_data_modified =             convert_i32_to_ui24(audio_data).tobytes()

    elif sample_width == 4:
        raw_data_modified =             audio_data.astype('<i4').tobytes()

    else:
        raise ValueError("Wrong format")

    with wave.open(wav_filename_out, 'wb') as output_wav:
        output_wav.setnchannels(num_channels)
        output_wav.setsampwidth(sample_width)
        output_wav.setframerate(frame_rate)
        output_wav.writeframes(raw_data_modified)

message = "Hidden text"
embed("audio.wav", "audio_stego.wav", message)
To extract the message we perform the inverse operation. As in the previous section, we have not established a mechanism to automatically determine the end of the message; in this example we extract directly 88 bits—the length we know. As also noted earlier, the proper approach is to use a header with message length or an explicit end‑of‑message marker.
Thus, the first step is to convert the known message length to a multiple of 3 (because we use $p=3$). We then iterate over audio samples block by block, extracting the corresponding 3 bits from each block and storing them in message_bits, and finally regroup them to recover the original encoding.
import wave
import numpy as np

P = 3
BLOCK_LEN = 2**P-1
M = np.array([
    [0, 0, 0, 1, 1, 1, 1],
    [0, 1, 1, 0, 0, 1, 1],
    [1, 0, 1, 0, 1, 0, 1]
])

def ME_extract(M, s):
    return np.dot(M, s) % 2

# < convert_ui24_to_i32  code

def extract(wav_filename_in, msglen):
    wav_file = wave.open(wav_filename_in, 'rb')
    num_channels = wav_file.getnchannels()
    sample_width = wav_file.getsampwidth()
    frame_rate = wav_file.getframerate()
    num_frames = wav_file.getnframes()

    raw_data = wav_file.readframes(num_frames)
    wav_file.close()

    if sample_width == 1:
        audio_data = np.frombuffer(raw_data, dtype=np.uint8)
        audio_data = audio_data.astype(np.int16) - 128

    elif sample_width == 2:
        audio_data = np.frombuffer(raw_data, dtype='<i2')

    elif sample_width == 3:
        audio_data = np.frombuffer(raw_data, dtype=np.uint8)
        audio_data = convert_ui24_to_i32(audio_data)

    elif sample_width == 4:
        audio_data = np.frombuffer(raw_data, dtype='<i4')

    else:
        raise ValueError("Wrong format")

    l = msglen + (-msglen) % P
    num_blocks = (l//3)

    message_bits = []
    for i in range(0, num_blocks*BLOCK_LEN, BLOCK_LEN):
        s = audio_data[i:i+BLOCK_LEN]%2
        m = ME_extract(M, s)
        message_bits.extend(m.tolist())

    message_bits = ''.join(map(str, message_bits))
    message = ''.join(chr(int(message_bits[i:i+8], 2))         for i in range(0, len(message_bits), 8))

    return message

message = extract("audio_stego.wav", 88)
print(message)
At this point it is useful to compute and compare the efficiency of matrix embedding versus traditional LSB matching for hiding information in audio files. The efficiency table for matrix embedding shows how relative capacity and efficiency vary as a function of $p$, which we will use as the basis for these calculations.
Consider a stereo audio file with a sampling frequency of 44.1 kHz and a duration of 10 seconds. The total number of samples is $44100 \times 10 \times 2 = 882000$. If we apply LSB matching, we could insert one bit per sample, allowing up to $882000$ bits. However, to minimize detectability and reduce distortion, suppose we embed in only 10% of samples, giving an effective capacity of $88200$ bits. Since in LSB matching about half the samples already have the correct LSB by chance, we would modify about $44100$ samples.
If instead we use matrix embedding with $p=7$, the relative payload is $0.0551$. This implies we can hide approximately $882000 \times 0.0551 = 48598$ bits. Moreover, the number of required modifications is much smaller—approximately $882000 / (2^7-1) = 6944$ altered samples. Thus, the number of modifications to embed a similar amount of information drops dramatically—from $44100$ to $6944$—making the message harder to detect. This advantage becomes even more evident as the amount of embedded information decreases.
Adaptive Embedding
Introduction
In the previous section we explored LSB matching and how its efficiency can be improved with matrix embedding. This permits inserting a comparable amount of data with fewer modifications, thereby reducing detection probability. The next step is to optimize where to embed, prioritizing regions where hidden information will be less evident.
For audio, the selection of regions is particularly critical. Unlike images—where pixel values vary considerably even in uniform areas—audio files may contain segments of absolute silence, represented by long sequences of samples with zero or near‑zero values. Embedding in these regions can be problematic, since any modification in a zone of absolute silence is easily detectable.
To avoid this, it is essential to employ adaptive embedding that evaluates the signal structure and dynamically selects the most suitable areas for modification. In particular, regions with higher energy or spectral complexity are often more appropriate, because changes are better masked within the content.
The development of Syndrome Trellis Codes (STC) [Fil:2011:stc], introduced in Embedding Techniques: How to Avoid Detectable Areas, marked a turning point in steganography by establishing a new approach to hiding information. These codes decouple steganography into two independent stages: first, computing a modification cost for each sample; second, embedding the message while minimizing the total cost of changes.
In the first stage, the goal is to define a criterion that quantifies the probability of detection for altering a given sample, assigning a cost according to its susceptibility. In the second stage, embedding is optimized so that the sum of costs for modified samples is minimal.
Since STC handles the second stage, designing a new steganographic method based on this technique reduces to developing an effective cost function for each sample—simplifying the construction of more sophisticated hiding schemes.
Cost Computation
Most cost‑computation methods for audio steganography are experimental and lack a rigorous mathematical foundation that precisely indicates where in the signal it is safest to modify samples without detection. Consequently, the standard approach is to test different strategies and validate them via steganalysis—comparing them to existing methods. If a new cost function makes detection more difficult for steganalysis algorithms compared with previous functions, we may consider it more effective.
There are, however, cases where the choice of embedding regions is clear. In particular, sections of absolute silence must be avoided: any modification there is highly detectable due to the complete absence of variability in the original signal. Beyond these obvious cases, optimizing the cost function remains challenging, since the perceptibility of changes depends on factors such as signal energy, transients, and the sensitivity of the auditory system.
This process is complex because experimental results depend heavily on the choice of audio dataset. If the dataset is not broad and diverse enough, results may not be representative, yielding cost functions that perform well only for specific signals and do not generalize properly.
This challenge is beyond the scope of this book. Nevertheless, we will explore how to construct a cost function progressively using filters, a widely used approach in the field.
A filter is a mathematical function applied to an audio signal to emphasize or attenuate certain characteristics of its samples. In steganographic cost computation, filters analyze the local structure of the signal to determine where insertion is least detectable.
Filters can be designed to capture different aspects of the audio signal—such as transients, amplitude variations, or changes in spectral content. For example, a filter based on local energy can help identify silent regions (where modification is more obvious) and distinguish them from high‑energy or noisy regions (where changes are less perceptible).
There are many filters used in audio processing to analyze structures and specific patterns. Among them, transient‑detection filters—such as those analyzing the derivative of the signal envelope—identify abrupt changes, highlighting short‑duration events. Spectral filters—based on the Fourier transform or Mel filter banks—can emphasize the presence of certain frequencies, helping locate regions safer for embedding.
Mathematically, a filter is often represented as a convolution between the audio signal and an analysis window (kernel), which defines the transformation applied to each sample as a function of its neighbors.
We start with a simple idea: ignore silence. Reading audio samples in Python, we may find silent zones like the following:
>>> samples[0:100]
array([0,0,0,0,0,0,0,0,0,0,0,0,0,0,0,0,0,0,0,0,0,0,
       0,0,0,0,0,0,0,0,0,0,0,0,0,0,0,0,0,0,0,0,0,0,
       0,0,0,0,0,0,0,0,0,0,0,0,0,0,0,0,0,0,0,0,0,0,
       0,0,0,0,0,0,0,0,0,0,0,0,0,0,0,0,0,0,0,0,0,0,
       0,0,0,0,0,0,0,0,0,0,0,0], dtype=int16)
If we apply LSB matching, we could obtain something like this:
array([0, 0, 1,-1,-1,-1, 1,-1, 1, 0, 0, 0, 1,-1,-1, 1, 1,
       1,-1, 1, 0,-1,-1, 1, 1, 0, 1,-1, 1, 0,-1, 1, 1, 0,
       0, 1, 1,-1, 0, 0, 0,-1,-1, 1, 0, 1,-1,-1, 0, 1, 0,
      -1, 0, 0, 0,-1, 0, 0, 1,-1,-1,-1,-1,-1,-1, 0, 0,-1,
       1, 0, 0, 0, 0, 1, 0, 0, 0,-1, 1, 1, 1, 1,-1, 1,-1,
       1, 1, 0, 1,-1, 0,-1, 1, 1, 1,-1,-1, 1, 1, 0],
       dtype=int16)
Since modifications in silent or near‑zero regions are the most easily detectable in an audio signal, we start by designing a cost function that penalizes these areas. To do so, we define cost as the inverse of the sample’s absolute value. Samples with low magnitude receive a high cost, whereas samples with larger amplitude receive a lower cost.
This encourages STC to prioritize embedding in regions with significant amplitude, avoiding insertion in low‑energy or near‑zero areas unless no alternative exists. In this way, detection probability is minimized because modifications are hidden within the signal’s natural variations.
We define the cost function $C(i)$ for an audio sample $x_i$ as
\[C(i) = \frac{1}{|x_i| + \epsilon}\]where
- $C(i)$ is the cost of modifying sample $x_i$,
-
$ x_i $ is the absolute value of the sample amplitude, - $\epsilon$ is a small positive constant to avoid division by zero when $x_i = 0$.
This function assigns a high cost to small values and a low cost to larger amplitudes.
A simple implementation is:
import numpy as np

def cost(audio_samples, epsilon=1e-20):
    return 1 / (np.abs(audio_samples) + epsilon)
``

This provides a straightforward way to avoid the most detectable samples and implements a **high‑amplitude‑first** embedding policy. Another approach is to prioritize **complex** regions using filters. One such option is a **derivative filter** [[chen:2020:audio_derivative](/stego/books/stegopython/references-en/#chen2020audio_derivative)], yielding the cost

$$
C(i) =  \frac{1}{|x_i| + |r_f| + \epsilon}
$$

where

- $x_i$ is the original audio sample,
- $r_f$ is the derivative filter residual obtained by applying filter $f_n$ to the original signal:

  $$
  r_f = f_n \otimes x_i
  $$

  with $\otimes$ denoting convolution;

- $\epsilon$ is a small positive constant to avoid division by zero.

This cost penalizes modifications in low‑amplitude samples and in regions where the signal varies little, while favoring insertion in high‑energy or transient regions where changes are less perceptible.

Below is an implementation using the filter `[-1, 2, 1]`. The reader may experiment with other filters such as `[1, -3, 3, -1]` or `[-1, 4, -6, 4, -1]`, and others analyzed in [[chen:2020:audio_derivative](/stego/books/stegopython/references-en/#chen2020audio_derivative)].

```python
import numpy as np
from scipy.signal import convolve

def cost(audio_samples, epsilon=1e-20):
    f = np.array([-1, 2, 1])
    r_f = convolve(audio_samples, f, mode='same')
    cost = 1/(np.abs(audio_samples)+np.abs(r_f)+epsilon)
    return cost
In the next section we show how to use this cost function to embed information using STC.
Syndrome Trellis Codes
In Embedding Techniques: How to Avoid Detectable Areas we reviewed how Syndrome Trellis Codes (STC) work and how to use them via the pySTC library. Applying them to audio is straightforward: compute the costs and call the library to hide the message. We will use the cost function proposed in [chen:2020:audio_derivative] introduced above.
The following Python code embeds information with STC in the first audio channel. It is similar to previous examples, except for the STC‑based embedding, applied as in Embedding Techniques: How to Avoid Detectable Areas.
Embedding code:
import wave
import pystc
import numpy as np
from scipy.signal import convolve

# <cost function code>
# <convert_ui24_to_i32 code>
# <convert_i32_to_ui24 code>

def embed(wav_filename_in, wav_filename_out,
          message, seed=32):

    wav_file = wave.open(wav_filename_in, 'rb')

    num_channels = wav_file.getnchannels()
    sample_width = wav_file.getsampwidth()
    frame_rate = wav_file.getframerate()
    num_frames = wav_file.getnframes()

    raw_data = wav_file.readframes(num_frames)
    wav_file.close()

    if sample_width == 1:
        mx, mn = 127, -128
        audio_data = np.frombuffer(raw_data, dtype=np.uint8)
        audio_data = audio_data.astype(np.int16) - 128

    elif sample_width == 2:
        mx, mn = 32767, -32768
        audio_data = np.frombuffer(raw_data, dtype='<i2')

    elif sample_width == 3:
        mx, mn = 8388607, -8388608
        audio_data = np.frombuffer(raw_data, dtype=np.uint8)
        audio_data = convert_ui24_to_i32(audio_data)

    elif sample_width == 4:
        mx, mn = 2147483647, -2147483648
        audio_data = np.frombuffer(raw_data, dtype='<i4')

    else:
        raise ValueError("Wrong format")

    audio_data = audio_data.copy()


    if num_channels > 1:
        audio_data = audio_data.reshape(-1, num_channels)
        audio_data_ch1 = audio_data[:,0]
    else:
        audio_data_ch1 = audio_data

    costs = cost(audio_data_ch1)

    audio_data_ch1 = audio_data_ch1.reshape(-1,1)
    audio_data_ch1 = pystc.hide(message.encode(),
            audio_data_ch1, costs, costs, seed, mx, mn)
    audio_data_ch1 = audio_data_ch1.reshape(-1)

    if num_channels > 1:
        audio_data[:,0] = audio_data_ch1
        audio_data = audio_data.reshape(-1)
    else:
        audio_data = audio_data_ch1


    if sample_width == 1:
        raw_data_modified =             (audio_data + 128).astype(np.uint8).tobytes()

    elif sample_width == 2:
        raw_data_modified =             audio_data.astype('<i2').tobytes()

    elif sample_width == 3:
        raw_data_modified =             convert_i32_to_ui24(audio_data).tobytes()

    elif sample_width == 4:
        raw_data_modified =             audio_data.astype('<i4').tobytes()

    else:
        raise ValueError("Wrong format")

    with wave.open(wav_filename_out, 'wb') as output_wav:
        output_wav.setnchannels(num_channels)
        output_wav.setsampwidth(sample_width)
        output_wav.setframerate(frame_rate)
        output_wav.writeframes(raw_data_modified)


seed = 32 # secret seed
message = "Hidden text"
embed("audio.wav", "audio_stego.wav", message, seed)
There are currently no comments on this article.
Add a Comment