In this article we are going to see how to embed information in images and audio using the least significant bit (LSB) of each byte.
Content
- Information in the least significant bit
- Two usual techniques
- Information embedding with LSB replacement
- Information embedding with LSB matching
- Information extraction
- The dangers of LSB replacement
- Towards a more efficient embedding
- LSB steganography in bitmap images
- LSB steganography in JPEG images
- LSB steganography in WAV audio files
Information in the least significant bit
The main objective of steganography is not to be detected. Therefore, we will always try to modify the information of the media in which we want to hide a message, so that the modification goes unnoticed.
We will also be interested in modifying values that a steganalyst cannot easily predict. Since if its original value can be deduced, it will suffice to compare it with the value of the analyzed media to know that it has been altered. Or in any case, make the use of steganography suspicious.
For this reason, those digital media made of data difficult to model statistically are especially suitable for hiding information. Some media of this type, commonly used in steganography, are images, audio and video.
Even if you have a media made of data difficult to model, it is recommended to make as few modifications as possible. And the minimum modification that we can make on a byte is a modification of a unit. Let us take as an example a byte with a value of 160. Its representation in binary is as follows:
| 1 | 0 | 1 | 0 | 0 | 0 | 0 | 0 |
The least significant bit (LSB) has been marked in bold, which in this case has the value 0. That is, this byte contains a message bit embedded with a value of 0. If this is the value we want to embed, there will be no need to perform any operation. But if the value of the bit of the message that we want to embed is 1, we will have to perform an operation on the value of the byte that changes its LSB.
Two usual techniques
There are two common techniques for embedding information in the least significant bit of a byte: LSB replacement and LSB matching. LSB replacement is an insecure technique, for which there are multiple attacks and which simply consists of replacing the value of the LSB with the value of the message.
Continuing with the previous example, to embed a 1 in a byte with value 160:
| 1 | 0 | 1 | 0 | 0 | 0 | 0 | 0 |
All we have to do is replace the LSB with 1:
| 1 | 0 | 1 | 0 | 0 | 0 | 0 | 1 |
As we have said before, this technique is known as LSB replacement and its use is not recommended, since it is detectable. The section The dangers of LSB replacement explains what makes this technique unsafe.
Another way to modify the LSB is to add 1 or subtract 1 to the value of the byte. For example, if we add 1 to:
| 1 | 0 | 1 | 0 | 0 | 0 | 0 | 0 |
It will give us as a result:
| 1 | 0 | 1 | 0 | 0 | 0 | 0 | 1 |
and if we subtract 1, we will get:
| 1 | 0 | 0 | 1 | 1 | 1 | 1 | 1 |
In both cases we have modified the LSB, so in both cases we have a 1 embedded as the value of the message. The second case, however, has modified 5 bits. But this should not be considered more insecure, since in both cases we have modified the value of the byte by one unit.
This technique is known as LSB matching or ±1 embedding and is much more secure than the previous one.
Information embedding with LSB replacement
Suppose we have the following values, corresponding to a group of bytes obtained from the digital media in which we want to hide the message:
| 160 | 60 | 53 | 128 | 111 | 43 | 84 | 125 |
If we obtain its value in binary we have:
| 10100000 | 00111100 | 00110101 | 10000000 |
| 01101111 | 00101011 | 01010100 | 01111101 |
Suppose now that we want to hide a byte, for example the one corresponding to the value of the letter ‘A’ in ASCII encoding. This value corresponds to the number 65, whose binary representation is as follows:
| 0 | 1 | 0 | 0 | 0 | 0 | 0 | 1 |
We will do this by replacing the value of the least significant bit of each value:
| 10100000 | 00111101 | 00110100 | 10000000 |
| 01101110 | 00101010 | 01010100 | 01111101 |
So we will get the following values:
| 160 | 61 | 52 | 128 | 110 | 42 | 84 | 125 |
At the beginning of steganography in digital images, it was mistakenly thought that this was the most appropriate way to hide information, since it only modifies one bit. From an intuitive point of view it makes a lot of sense, since this technique allows us to insert a bit of information by modifying the value of the byte as little as possible. However, this operation introduces significant changes in the statistical distribution of the bytes, which makes it very detectable.
Let’s see how to embed a message using the Python programming language. The first thing we need to do is convert the message into a list of ones and zeros.
message_bits = []
message = [ord('A')] # message = [65]
for m in message:
    message_bits += [ (m>>i)&1 for i in range(8) ]
If we want to obtain the data from, for example, a text file, it would suffice to:
f = open('secret_data.txt', 'r')
message = [ord(b) for b in f.read()]
Once we have the bits of the message that we want to embed, we only have to go through the bytes corresponding to the media in which we want to embed the message (image, audio, video, …) and modify its LSB with the corresponding bit of the message.
Suppose a variable cover containing the values of the bytes read from the media (enough bytes to embed the entire message) and a variable stego of the same length as cover, in which we will save the state of the media after hiding the message. Then:
cover = [ 160, 60, 53, 128, 111, 43, 84, 125 ]
stego = cover.copy()
for i in range(len(message_bits)):
    stego[i] = (cover[i] & ~1) | message_bits[i]
>> cover
[160, 60, 53, 128, 111, 43, 84, 125]
>>> stego
[160, 61, 52, 128, 110, 42, 84, 125]
The content of the cover variable will come from the media in which we want to embed information, which can be an image, an audio file, a video, etc.
Information embedding with LSB matching
LSB matching is a technique that, from the point of view of the value of the LSB, offers the same results as LSB replacement. However, this technique does not introduce the statistical anomalies that the LSB replacement introduces, so it is the recommended way of embedding information in the LSB.
Let’s go back to the previous example to see how information would be embedded using LSB matching. Recall that we used the following values:
| 160 | 60 | 53 | 128 | 111 | 43 | 84 | 125 |
which in binary correspond to:
| 10100000 | 00111100 | 00110101 | 10000000 |
| 01101111 | 00101011 | 01010100 | 01111101 |
To embed the message, we add or subtract 1 randomly to those pixels in which the value of the LSB does not coincide with the bit of the message that we want to hide. For example:
| (+0) 10100000 | (+1) 00111101 | (-1) 00110100 | (+0) 10000000 |
| (-1) 01101110 | (+1) 00101100 | (+0) 01010100 | (+0) 01111101 |
In this case, the result is:
| 160 | 61 | 52 | 128 | 110 | 44 | 84 | 125 |
With this technique we are hiding one bit in each byte.
In steganography, the total number of bytes that the media has available to hide information is taken as a reference for the number of bits that can be hidden for a capacity of 100%. That is, embedding a bit in each of the available bytes. Therefore, we will say that a technique has a capacity or payload of 100% if it hides one bit in each byte. Thus, a method that embeds one bit in every four bytes will have a capacity of 25% and a method that embeds two bits in each byte will have a capacity of 200%. However, it will be usual to work with small capacities, since the more data that is hidden, the more insecure (detectable) the method will be.
Let’s now see how to embed a message using the Python programming language. In the same way as in the previous section, we will start by converting the values that represent the message into ones and zeros:
message_bits = []
message = [ord('A')] # message = [65]
for m in message:
    message_bits += [ (m>>i)&1 for i in range(8) ]
Next we will embed them in the cover values. Although this time we will do it using LSB matching, that is, adding or subtracting 1 randomly:
import random
cover = [ 160, 60, 53, 128, 111, 43, 84, 125 ]
stego = cover.copy()
for i in range(len(message_bits)):
    if cover[i]%2 != message_bits[i]:
        stego[i] = cover[i] + random.choice([-1, +1])
>>> cover
[160, 60, 53, 128, 111, 43, 84, 125]
>>> stego
[160, 61, 54, 128, 110, 44, 84, 125]
It is important to note that the addition of 1 or -1 could generate a result out of range. The bytes range from 0 to 255, so we cannot use negative values or positive values greater than 255. That is, when embedding a message we will have to control that 1 is never subtracted from the 0 values and that 1 is never added to the 255 values.
Information extraction
To extract the message we only have to read the LSB of the values of the bytes corresponding to the media that contains the message. The same procedure is valid for reading embedded data with LSB replacement and with LSB matching.
Let’s see how to perform this operation using Python. First we extract the bits:
message_bits = [ s%2 for s in stego ]
In this case, the variable stego contains the values of the bytes extracted from the digital media.
Now we have to group the bits 8 by 8 to form the byte value of the original message:
message_ex = []
value = 0
for i in range(len(message_bits)):
    if i%8==0 and i!=0:
        message_ex.append(value)
        value = 0
    value |= message_bits[i] << i%8
>>> ''.join([chr(l) for l in message_ex])
'A'
The dangers of LSB replacement
We have commented that the LSB replacement is insecure, which in steganography means that it is detectable. This is because embedding is done asymmetrically, that is, there is not the same probability of increasing a value as decreasing it.
When we replace the LSB of an even value (an LSB with value 0) for a bit of the message with value 1, the effect is the same as adding one to that value. Similarly, when we replace the LSB of a pixel with an odd value (an LSB with a value of 1) for a bit of the message with a value of 0, the effect is the same as subtracting one from that value. This is an asymmetric operation, in the sense that 1 is never added to an odd value and 1 is never subtracted from an even value.
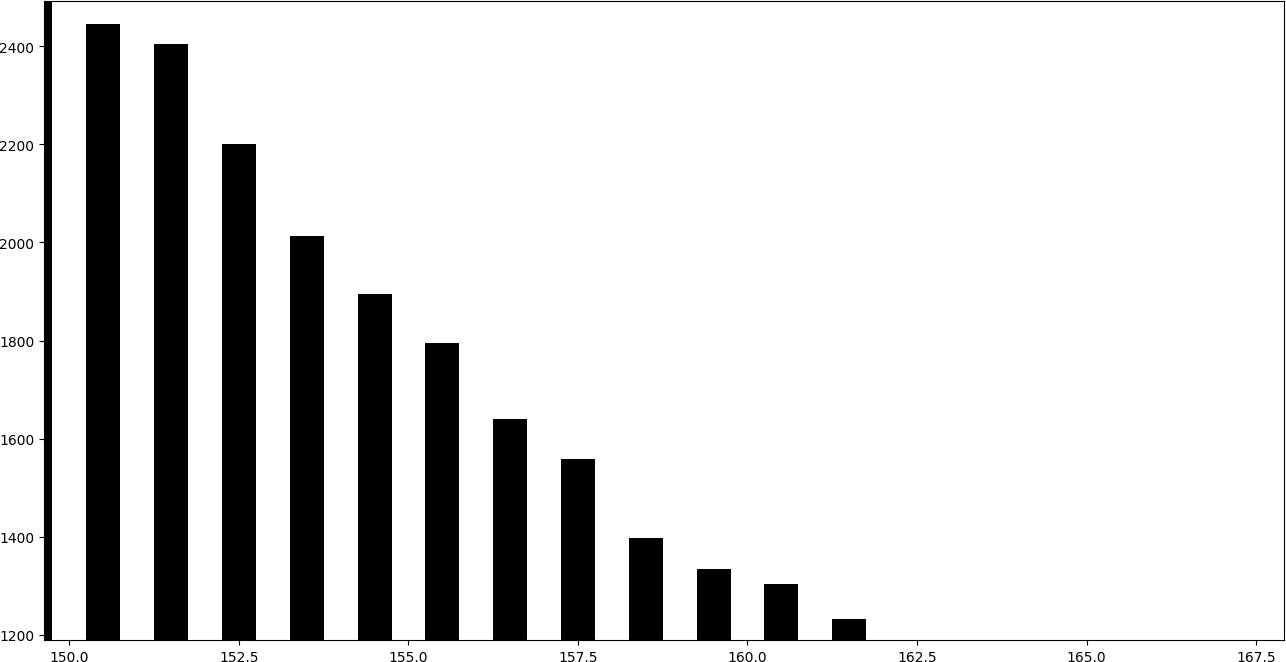
To see what it means to embed information in this way, it is very illustrative to draw a histogram of values. That is, a bar graph in which each bar represents the number of equal values.
The following graph corresponds to an image that has not been altered using LSB replacement.
Instead, the following graph corresponds to an image in which a message has been embedded using LSB replacement.
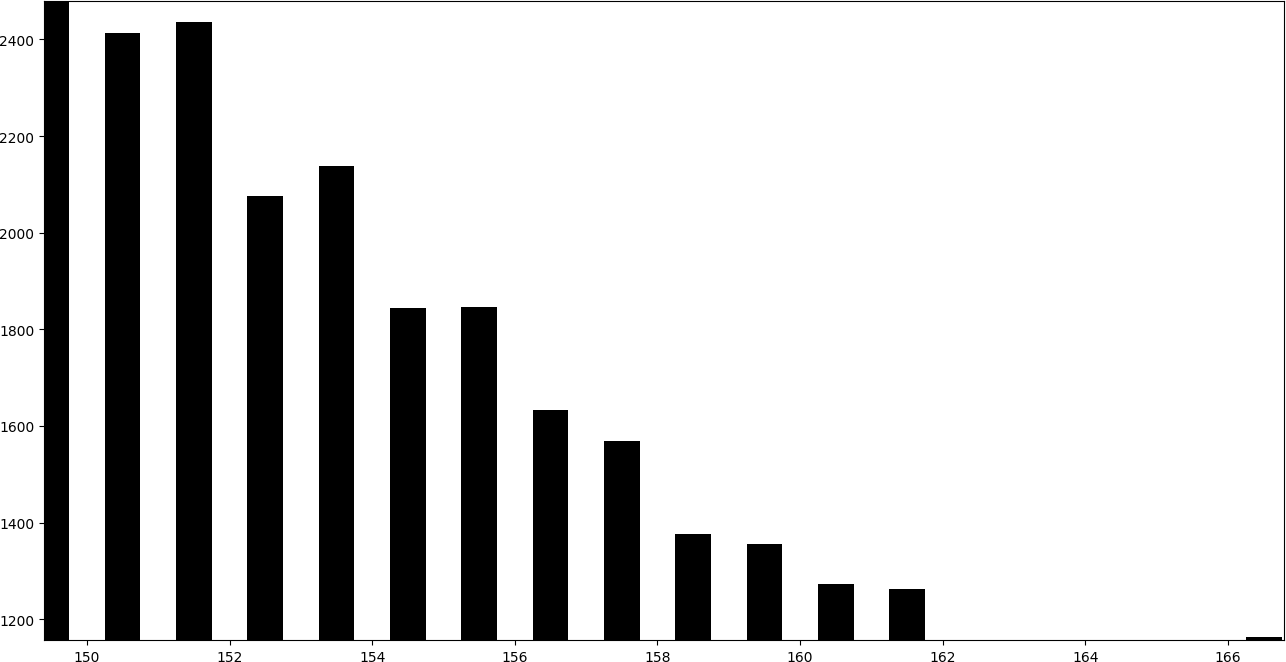
In the histogram it can be seen that the consecutive pairs of bars tend to obtain a similar height.
By adding one to the even bars, they give part of their values to the subsequent bar, while subtracting one to the odd bars, they give part of their values to the previous bar. Therefore, even-odd pairs of consecutive bars tend to take a similar height.
There is a whole family of attacks dedicated to exploiting this statistical anomaly introduced by the LSB replacement. These attacks are known as structural attacks and can be exploited with steganalysis tools like Aletheia. In Practical attack on LSB replacement schemes it is explained how to use this tool to detect this type of steganography schemes, used by many popular tools such as OpenStego and OpenPuff.
Towards a more efficient embedding
A very important concept in steganography is that of embedding efficiency. An efficiency of 1 would correspond to an insertion technique that modifies all the bytes in which a bit is embedded. That is, one modification for each inserted bit.
However, the two techniques we have described are more efficient. Well, statistically, half of the bytes in which we want to hide information will already have the LSB value of the bit of the message we want to embed, so it will not be necessary to modify it. Thus, we will be embedding a bit in each byte, but we will only be modifying half of the bytes. Consequently, the efficiency of these techniques is 2 bits per modification.
Although it may surprise, there are even more efficient techniques. Techniques that allow us to embed information with much higher efficiencies. For example, an embedding based on Hamming codes allows us to embed $p$ bits into $2^p-1$ bytes with a single modification. If we used, for example, $p=3$ we could embed 3 bits in each 7-byte block with a single modification. Our efficiency in this case would be 3,429.
There are many families of codes that allow us to perform this type of efficient embedding. These topics are covered in some detail in the following articles:
LSB steganography in bitmap images
Bitmap type images are those that represent the value of pixels in a matrix. If the image is grayscale, each value in the array is a byte, that is, a number from 0 to 255 that represents the intensity of the pixel. The value 0 would indicate the color black, while a value 255 would indicate the color white. Thus, all intermediate values would represent the different shades of gray.
More commonly, however, images are color and represent pixels with a set of three bytes: the amount of red (R), the amount of green (G), and the amount of blue (B). This type of representation (RGB) is very common, although RGBA is also common, which uses an additional byte to store the transparency level of the pixel.
Let’s see how we can read an image using Python:
import imageio
I = imageio.imread("cover-image.png")
In a grayscale image we would find something similar to what we see below:
>>> I.shape
(512, 512)
>>> I[:10, :10]
Array([[155, 155, 155, 154, 155, 149, 156, 153, 158, 154],
       [155, 155, 155, 154, 155, 149, 156, 153, 158, 154],
       [155, 155, 155, 154, 155, 149, 156, 153, 158, 154],
       [155, 155, 155, 154, 155, 149, 156, 153, 158, 154],
       [155, 155, 155, 154, 155, 149, 156, 153, 158, 154],
       [157, 157, 150, 148, 154, 152, 151, 152, 153, 153],
       [153, 153, 157, 151, 153, 155, 151, 148, 152, 155],
       [151, 151, 148, 150, 151, 151, 148, 150, 151, 154],
       [148, 148, 151, 151, 152, 153, 149, 150, 156, 150],
       [148, 148, 151, 151, 147, 147, 148, 150, 154, 146]], dtype=uint8)
However, if we perform the same operation on a color image, we will find three channels (the R, the G and the B):
>>> I.shape
(512, 512, 3)

>>> I[:10,:10, 0]
Array([[226, 226, 223, 223, 226, 226, 228, 227, 227, 225],
       [226, 226, 223, 223, 226, 226, 228, 227, 227, 225],
       [226, 226, 223, 223, 226, 226, 228, 227, 227, 225],
       [226, 226, 223, 223, 226, 226, 228, 227, 227, 225],
       [226, 226, 223, 223, 226, 226, 228, 227, 227, 225],
       [227, 227, 227, 222, 226, 228, 226, 230, 225, 228],
       [228, 228, 225, 224, 225, 229, 229, 229, 227, 227],
       [223, 223, 226, 221, 227, 225, 226, 228, 226, 224],
       [225, 225, 224, 224, 225, 224, 229, 225, 226, 225],
       [223, 223, 224, 222, 227, 225, 224, 227, 228, 223]], dtype=uint8)

>>> I[:10,:10, 1]
Array([[137, 137, 137, 136, 138, 129, 138, 134, 140, 136],
       [137, 137, 137, 136, 138, 129, 138, 134, 140, 136],
       [137, 137, 137, 136, 138, 129, 138, 134, 140, 136],
       [137, 137, 137, 136, 138, 129, 138, 134, 140, 136],
       [137, 137, 137, 136, 138, 129, 138, 134, 140, 136],
       [140, 140, 131, 130, 136, 133, 132, 133, 136, 134],
       [134, 134, 141, 133, 134, 137, 132, 128, 134, 137],
       [133, 133, 129, 132, 131, 133, 129, 131, 131, 137],
       [129, 129, 133, 133, 134, 134, 130, 132, 139, 131],
       [130, 130, 133, 134, 128, 127, 129, 130, 135, 128]], dtype=uint8)

>>> I[:10,:10, 2]
Array([[125, 125, 133, 128, 120, 116, 123, 124, 127, 119],
       [125, 125, 133, 128, 120, 116, 123, 124, 127, 119],
       [125, 125, 133, 128, 120, 116, 123, 124, 127, 119],
       [125, 125, 133, 128, 120, 116, 123, 124, 127, 119],
       [125, 125, 133, 128, 120, 116, 123, 124, 127, 119],
       [123, 123, 113, 111, 120, 115, 120, 113, 109, 117],
       [119, 119, 116, 115, 125, 112, 116, 105, 113, 120],
       [121, 121, 106, 114, 120, 116, 112, 106, 124, 116],
       [106, 106, 112, 110, 118, 127, 108, 110, 125, 113],
       [104, 104, 109, 117, 102, 109, 108, 115, 120, 104]], dtype=uint8)
Once we have access to the Numpy array containing the data, we can embed a message using the techniques described in the previous sections. If we call our modified array with the hidden message Is, we can save the image in Python by:
imageio.imwrite("stego-image.png", Is)
To finish, let’s look at a complete example where we save the string "Hello World to an image. First we get the representation of the message as a list of bits. Next we get a cover vector of 128 pixels in which we are going to hide the message. Next, we modify the cover vector obtaining the stego vector modifying the LSB of each byte to embed the message bit. Finally, we save the image with the modified data.
import imageio
import random
I = imageio.imread("cover-image.png")

message_bits = []
for l in "Hello World":
    message_bits += [ (ord(l)>>i)&1 for i in range(8) ]

cover = I[:128, 0, 0]
stego = cover.copy()

for i in range(len(message_bits)):
    if cover[i]%2 != message_bits[i]:
        if cover[i] == 255:
            s = -1
        elif cover[i] == 0:
            s = +1
        else:
            s = random.choice([-1, +1])
        stego[i] = cover[i] + s

I[:128, 0, 0] = stego
imageio.imwrite("stego-image.png", I)
Next, let’s extract the hidden message:
import imageio
Is = imageio.imread("stego-image.png")

stego = Is[:128, 0, 0]

message_bits = [ s%2 for s in stego ]

message_ex = []
value = 0
for i in range(len(message_bits)):
    if i%8==0 and i!=0:
        message_ex.append(value)
        value = 0
    value |= message_bits[i] << i%8
>>> ''.join([chr(l) for l in message_ex])
'Hello Worlde7<¢'
>>>
We can see some strange characters at the end of the extracted string. This is because we have extracted all the bits from the selected vector, which contains 128 pixels, even though the last ones are not used. A steganography tool could avoid the problem by indicating the length of the message in a hidden header.
LSB steganography in JPEG images
JPEG images have a much more complex operation than that of bitmap images. We are not going to detail how the entire compression and decompression process works. The indicated link is a good starting point for further information. We will, however, make a brief description of the process, focusing on the interesting parts for steganography.
To compress an image using the JPEG standard, we start with the bitmap that represents the image. We divide the bitmap into blocks of $8 \times 8$ pixels and apply the Discrete Cosine Transform (DCT) after subtracting 128 from the pixel value. As a result, we get a new block of $8 \times 8$ values, which we call DCT coefficients. These values are divided by predefined matrices called quantization matrices, rounded to the nearest integer. These arrays are designed to reduce the information in the high-frequency components, which are the most difficult for the human eye to distinguish. This type of operations involve loss of information, so once the image is compressed, its original state cannot be recovered. It is the result of these quantized DCT coefficients that is stored in the JPEG file, so, from the point of view of steganography, we will be interested in hiding information in these coefficients.
Usually, image processing libraries do not provide access to DCT coefficients, so we will have to use a special library that provides such access. We will use the JPEG Toolbox.
Once the library is installed, we can read the image as follows:
import jpeg_toolbox
img = jpeg_toolbox.load('cover-image.jpg')
>>> img['image_height']
512
>>> img['image_width']
512
>>> img['image_components']
3
From the information provided by this library, we will be mainly interested in the DCT coefficients. Let’s see how to access the three available channels:
>>> img['coef_arrays'][0].shape
(512, 512)

>>> img['coef_arrays'][0]
array([[86.,  2.,  2., ...,  0., -1.,  0.],
       [ 4.,  0.,  0., ..., -1.,  0., -1.],
       [-3.,  0., -1., ...,  0.,  0.,  0.],
       ...,
       [ 1.,  0.,  0., ...,  0.,  0.,  0.],
       [ 0.,  0.,  0., ...,  0.,  0.,  0.],
       [ 0.,  0.,  0., ...,  0.,  0.,  0.]])

>>> img['coef_arrays'][1]
array([[-60.,   3.,   0., ...,   0.,   0.,   0.],
       [  4.,   0.,   0., ...,   0.,   0.,   0.],
       [ -1.,   0.,   0., ...,   0.,   0.,   0.],
       ...,
       [  0.,   0.,   0., ...,   0.,   0.,   0.],
       [  0.,   0.,   0., ...,   0.,   0.,   0.],
       [  0.,   0.,   0., ...,   0.,   0.,   0.]])

>>> img['coef_arrays'][2]
array([[124.,  -3.,   1., ...,   0.,   0.,   0.],
       [ -3.,   0.,   0., ...,   0.,   0.,   0.],
       [  1.,   0.,   0., ...,   0.,   0.,   0.],
       ...,
       [  0.,   0.,   0., ...,   0.,   0.,   0.],
       [  0.,   0.,   0., ...,   0.,   0.,   0.],
       [  0.,   0.,   0., ...,   0.,   0.,   0.]])
Due to quantization, the number of zero-valued coefficients is usually very large. This number increases as the level of compression applied increases. It is not a good idea to hide information in those coefficients, since this could be suspicious. The first problem that we would find is that the size of the file would grow. This is because the way JPEG stores data avoids saving zeros, and if we hide information in those coefficients, the JPEG algorithm would have to store them. Additionally, the existence of values in coefficients in which, due to quantization, there should be zeros, would also be very suspicious.
Thus, in JPEG steganography, it is usual to avoid modifying the coefficients with a value of zero.
Once we have modified the DCT coefficients and we have hidden the message, we can save the new image as follows:
>>> jpeg_toolbox.save(img, 'stego-image.jpg')
Hiding information without using the zero coefficients has a certain complexity, because if we simply ignore them, the receiver of the message will have to do the same. But this implies that we will not be able to do any embedding operation that generates a new zero, since the receiver would not know that this zero should not be ignored. Trying not to generate new zeros could lead to introducing serious statistical anomalies that would make our system very detectable. There are different techniques to deal with this type of problem, although we will not cover them in this article. We will analyze the problem in detail in later articles.
Here’s a complete example where we’ll hide the string "Hello World". We will only use the DC coefficient, which is what we call the top left coefficient of each block of $8 \times 8$. This way we won’t affect the zeros and the receiver will know which coefficients to read.
We first represent the message to embed as a list of bits. Next we extract the coefficient from the upper left corner of each block of $8 \times 8$. We do this using Numpy’s indexing [::8,::8]. For the example, we only extract data from the first channel. Since the extracted data is represented as a two-dimensional array, we use the flatten() function to represent it as a vector. We then embed the message and represent the vector data again as a two-dimensional array. Finally, we save the data in a JPEG file.
import jpeg_toolbox

img = jpeg_toolbox.load('cover-image.jpg')

message_bits = []
for l in "Hello World":
    message_bits += [ (ord(l)>>i)&1 for i in range(8) ]

cover = img['coef_arrays'][0][::8,::8]
shape = cover.shape
cover = cover.flatten()
stego = cover.copy()

for i in range(len(message_bits)):
    if cover[i]%2 != message_bits[i]:
        stego[i] = cover[i] + random.choice([-1, +1])

img['coef_arrays'][0][::8,::8] = stego.reshape(shape)
jpeg_toolbox.save(img, 'stego-image.jpg')
Next, let’s extract the hidden message:
import jpeg_toolbox

img = jpeg_toolbox.load('stego-image.jpg')

stego = img['coef_arrays'][0][::8,::8].flatten()

message_bits = [ int(s)%2 for s in stego ]

message_ex = []
value = 0
for i in range(len(message_bits)):
    if i%8==0 and i!=0:
        message_ex.append(value)
        value = 0
    value |= message_bits[i] << i%8
>>> ''.join([chr(l) for l in message_ex])[:20]
'Hello World\x84iî\x94Ïøó¿Ø'
As in the previous case, we can see some strange characters at the end of the extracted string, because we have extracted bits that are not used.
LSB steganography in WAV audio files
Audio files WAV (see WAV format) are files that store the sound samples without using lossy compression, as is the case with other formats such as MP3.
In a similar way as we have done with the images, we can read the sound samples and modify its LSB to hide information.
Python has a module that allows us to easily read and write audio samples: the wav module.
We can read the frames as follows:
cover_wav = wave.open("cover-sound.wav", mode='rb')
frames = bytearray(cover_wav.readframes(cover.getnframes()))
We can modify and save them in a new file easily. For example, let’s add a unit to the first sample and save the modified file:
frames[0] += 1

stego_wav = with wave.open('stego-sound.wav', 'wb')
stego_wav.setparams(cover_wav.getparams())
stego_wav.writeframes(bytes(frames))
Now, as in the previous cases, we are going to see a complete example in which we will hide the string Hello World.
import wave
import random

cover_wav = wave.open("cover-sound.wav", mode='rb')
frames = bytearray(cover_wav.readframes(cover_wav.getnframes()))

message_bits = []
for l in "Hello World":
    message_bits += [ (ord(l)>>i)&1 for i in range(8) ]

for i in range(len(message_bits)):
    if frames[i]%2 != message_bits[i]:
        if frames[i] == 255:
            s = -1
        elif frames[i] == 0:
            s = +1
        else:
            s = random.choice([-1, +1])
        frames[i] = frames[i] + s

stego_wav = wave.open('stego-sound.wav', 'wb')
stego_wav.setparams(cover_wav.getparams())
stego_wav.writeframes(bytes(frames))

cover_wav.close()
stego_wav.close()
Next, let’s extract the hidden message:
import wave

cover_wav = wave.open("stego-sound.wav", mode='rb')
frames = bytearray(cover_wav.readframes(cover_wav.getnframes()))

message_bits = [ int(f)%2 for f in frames ]

message_ex = []
value = 0
for i in range(len(message_bits)):
    if i%8==0 and i!=0:
        message_ex.append(value)
        value = 0
    value |= message_bits[i] << i%8
>>> ''.join([chr(l) for l in message_ex])[:20]
Hello World¡GhÓ
As in the previous cases, we can see some strange characters at the end of the extracted string, because we have extracted bits that are not used.